设备节点的信息展示
电信网管系统中,设备的状态信息的实时展示非常重要,通常会以挂载一堆图标来展示状态或告警信息,图标展示的信息有限,有时需要更详细的面板或者图表,Qunee 中每个图元节点上可以挂载多个 UI 控件,支持9X9=81种相对位置,可以实现单节点上多个 ui 元素的排列和布局,另外每个 ui 元素都可以绑定图元属性,这使得信息可以实时更新,本文将结合最近客户提到的需求,使用 Qunee1.6 beta版本,实现在拓扑图中实现设备信息的显示 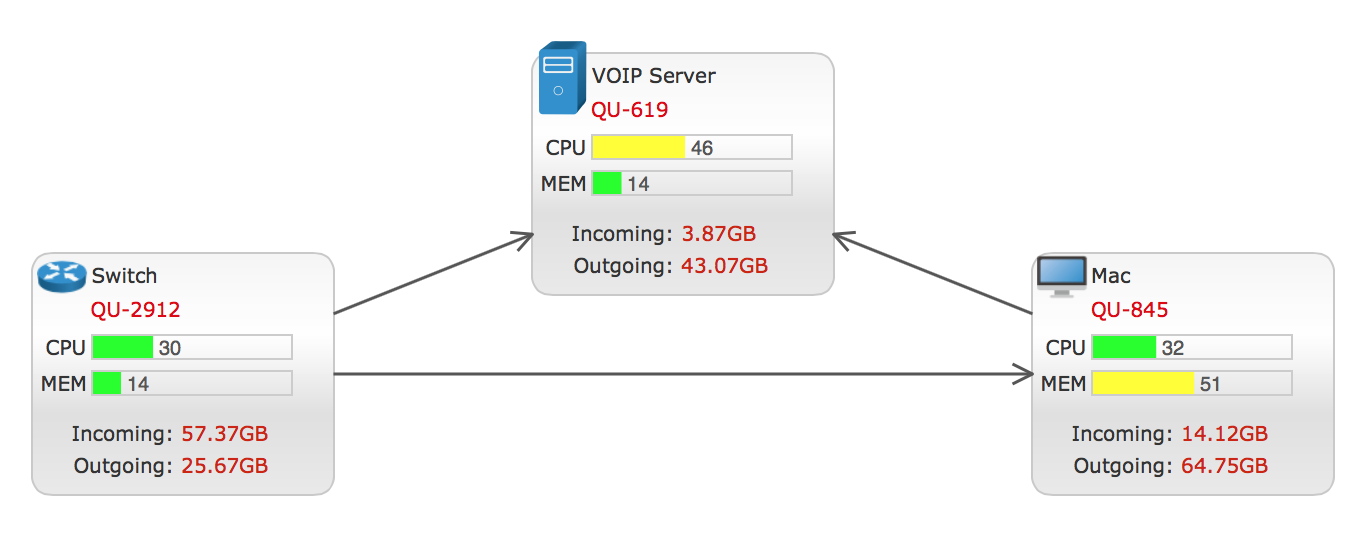
需求分析
网络设备拓扑图,默认设备为普通节点,双击时展开,显示CPU,内存,流量等信息,使用柱状图和不同颜色的文字来展示,再双击变回普通节点 这里需要定制节点,普通模式下,节点包含图标和文字,展开模式下,节点主体变成一个圆角矩阵的面板,上面分布多个组件:图标,文字,柱状图等,其中柱状图可以参照之前监控图例子中的BarUI,其他都有现成的组件可用,面板使用内置的Shape图形,图标依旧使用ImageUI,文字使用 LabelUI,位置分布则借助position和 anchorPosition 属性进行设置
CPU 柱状图的实现
以 CPU 柱状图为例,左边是文字,右边是柱状图,文字向右对齐,柱状图左对齐 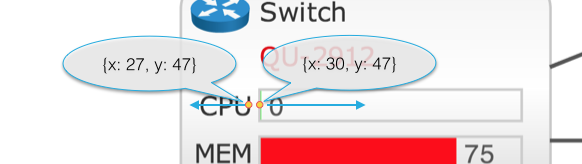 此外,还需要将 CPU 的数值与柱状图绑定,这里用到Q.Element#addUI(ui, bindingProperties)函数,在第二个参数中设定数据绑定,如果有多个属性需要绑定可以使用数组,下面的例子将cpuBar的 data 属性与 node 的cpu属性进行了绑定,绑定后就可以通过node.set(“cpu”, 0.45)这样的方式对 ui 进行属性设置了
CPU 柱状图相关代码
var cpu = new Q.LabelUI("CPU");
cpu.position = {x: 27, y: 47};
cpu.anchorPosition = Q.Position.RIGHT_MIDDLE;
var cpuBar = new BarUI();
cpuBar.position = {x: 30, y: 47};
cpuBar.anchorPosition = Q.Position.LEFT_MIDDLE;
node.addUI(cpu);
node.addUI(cpuBar, {
    property : "cpu",
    propertyType : Q.Consts.PROPERTY_TYPE_CLIENT,
    bindingProperty : "data"
});
node.set("cpu", 0.56);
实际使用中我们对函数做了封装,看起来会不太一样,下面是节点展开时的 ui 分布设置,主体为一个140 X 120的圆角矩形,上面分布多个文本,图标和柱状图
var w = 140, h = 120, r = 10;
var shape = Q.Shapes.getRect(-w/2, -h/2, w, h, r, r);
this.image = shape;
var gradient = new Q.Gradient(Q.Consts.GRADIENT_TYPE_LINEAR, ["#F4F4F4", "#FFFFFF", "#DFDFDF", "#E9E9E9"]);
gradient.angle = Math.PI / 2;
this.setStyle(Q.Styles.SHAPE_FILL_GRADIENT, gradient);
this.setStyle(Q.Styles.SHAPE_STROKE, 0);
this.setStyle(Q.Styles.SHAPE_OUTLINE, 1);
this.setStyle(Q.Styles.SHAPE_OUTLINE_STYLE, "#C9C9C9");
this.setStyle(Q.Styles.LAYOUT_BY_PATH, false);
function addUIAt(node, ui, x, y, bindingProperty, value){
    ui.syncSelection = false;
    ui.zIndex = 1;
    ui.position = {x: x, y: y};
    ui.anchorPosition = Q.Position.LEFT_TOP;
    ui.fontSize = 10;
    var binding;
    if(bindingProperty){
        binding = {
            property : bindingProperty,
            propertyType : Q.Consts.PROPERTY_TYPE_CLIENT,
            bindingProperty : "data"
        }
    }
    node.addUI(ui, binding);
    return ui;
}
var icon = new Q.ImageUI(image);
icon.size = this.iconSize;
addUIAt(this, icon, 15, 12, "icon").anchorPosition = Q.Position.CENTER_MIDDLE;
addUIAt(this, new Q.LabelUI(name), 30, 5);
addUIAt(this, new Q.LabelUI(id), 30, 22).color = "#D00";
addUIAt(this, new Q.LabelUI("CPU"), 27, 47).anchorPosition = Q.Position.RIGHT_MIDDLE;
addUIAt(this, new Q.LabelUI("MEM"), 27, 65).anchorPosition = Q.Position.RIGHT_MIDDLE;
addUIAt(this, new BarUI(), 30, 47, "cpu").anchorPosition = Q.Position.LEFT_MIDDLE;
addUIAt(this, new BarUI(), 30, 65, "memory").anchorPosition = Q.Position.LEFT_MIDDLE;
addUIAt(this, new Q.LabelUI("Incoming:"), 71, 90).anchorPosition = Q.Position.RIGHT_MIDDLE;
addUIAt(this, new Q.LabelUI("Outgoing:"), 71, 106).anchorPosition = Q.Position.RIGHT_MIDDLE;
var ui = addUIAt(this, new Q.LabelUI(), 75, 90, "incoming");
ui.anchorPosition = Q.Position.LEFT_MIDDLE;
ui.color = "#C20";
ui = addUIAt(this, new Q.LabelUI(), 75, 106, "outgoing");
ui.anchorPosition = Q.Position.LEFT_MIDDLE;
ui.color = "#C20";
大体效果
进一步封装
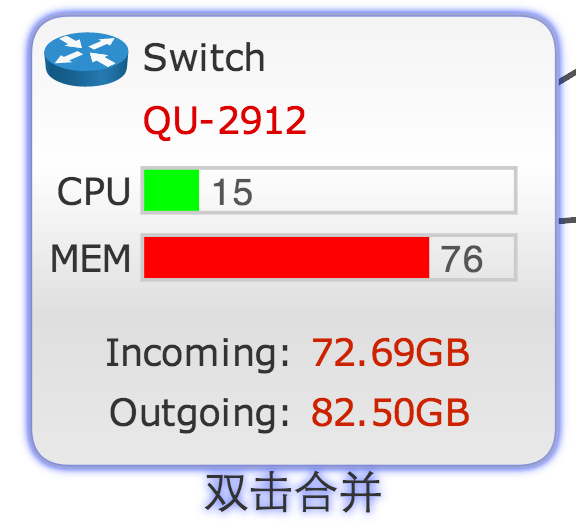
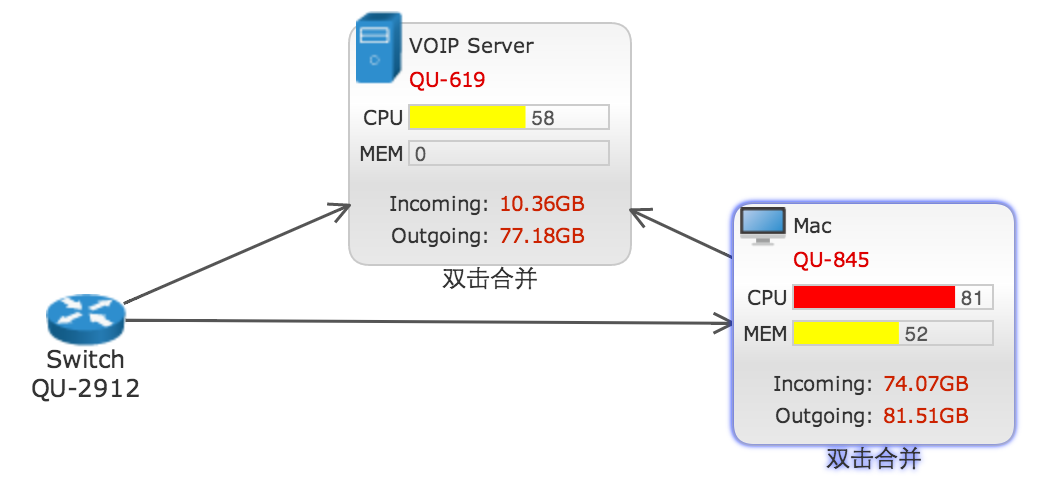
接下来进一步封装,实现普通模式和展开模式切换,并增加鼠标交互,双击进行切换 这里我们继承 Node,定义了一个CustomServerNode类,并增加了showDetail属性,默认为 true 表示展开状态,设置为 false 时则隐藏所有挂载的 ui,并设置image为图片,保留 image 和默认文本标签
showDetail属性定义
Object.defineProperties(CustomServerNode.prototype, {
    showDetail: {
        get: function(){
            return this._showDetail;
        },
        set: function(show){
            if(this._showDetail == show){
                return;
            }
            this._showDetail = show;
            this.image = show ? this.shape : this.get("image");
            this.name = show ? "双击合并" : (this.get("name") + "\\n" + this.get("id"));
            var uis = this.bindingUIs;
            if(uis){
                uis.forEach(function(ui){
                    ui.ui.visible = show;
                })
                this.invalidate();
            }
        }
    }
})
增加双击交互
graph.ondblclick = function(evt){
    var element = evt.getData();
    if(element){
        element.showDetail = !element.showDetail;
    }
}
运行效果
在线示例
[http://demo.qunee.com/#VOIP Demo](http://demo.qunee.com/#VOIP Demo)