添加UI组件
外观上看,每个图元由一个主体和多个孩子组件构成,默认节点呈现为一个图标和文字,这里的图标就是节点的主体,对于连线主体则为一条路径。

挂载孩子组件
除了默认的图形元素外,使用#addUI(…)方法,可以挂载更多孩子组件,每个组件可表示特定的信息,将图元属性与孩子组件属性相关联,可实现数据的联动效果
#addUI - 添加子组件
示例
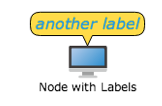
添加文本标签到节点,并将文本标签的内容和字体颜色与节点用户属性相绑定,通过修改节点属性来改变文本的内容和颜色
var nodeWithLabels = graph.createNode("Node with Labels", 0, -110);
var label2 = new Q.LabelUI();
label2.position = Q.Position.CENTER_TOP;
label2.anchorPosition = Q.Position.CENTER_BOTTOM;
label2.border = 1;
label2.padding = new Q.Insets(2, 5);
label2.showPointer = true;
label2.offsetY = -10;
label2.backgroundColor = Colors.yellow;
label2.fontSize = 16;
label2.fontStyle = "italic 100";
nodeWithLabels.addUI(label2, [{
     property : "label2",
     propertyType : Q.Consts.PROPERTY_TYPE_CLIENT,
     bindingProperty : "data"
    }, {
     property : "label2.color",
     propertyType : Q.Consts.PROPERTY_TYPE_CLIENT,
     bindingProperty : "color"
    }]);
nodeWithLabels.set("label2", "another label");
nodeWithLabels.set("label2.color", Colors.blue);
效果

扩展孩子组件
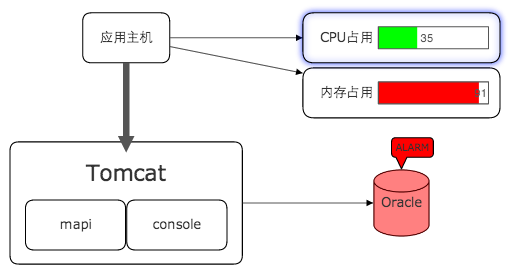
通过扩展孩子组件可以实现更丰富的效果,比如定制一个柱状图,挂载到节点,表示CPU占有率,或者挂载告警冒泡标示节点的状态
HTML5实现监控图
在线演示:Monitoring Demo

ScreenShot 2014-06-05 at 下午4.08.53.png
(image/png)
ScreenShot 2014-06-06 at 上午11.19.37.png
(image/png)
ScreenShot 2014-06-06 at 上午11.27.52.png
(image/png)
ScreenShot 2014-06-06 at 上午11.29.38.png
(image/png)
ScreenShot 2014-06-06 at 上午11.35.41.png
